Getting Started
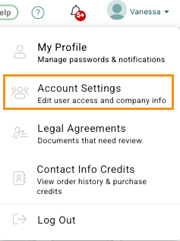
Administrators can navigate their account settings by selecting their name in the upper right-hand corner and then Account Settings. The Account Settings page lists all users tied to the company account, their user email address, their role, and their status (active/deactivated).
Adding New Users
There are 2 ways a new user can be added to Transect -- via invitation from the Admin or by accessing the Sign Up page. Check out this article to learn more about adding new users.
Changing a User's Role
A user's role can be modified within the 'Current Users' section. There are 2 roles: Admin and User.
| Permissions | Admin | User |
| Manage Company Settings | Yes | No |
| Manage User Permissions | Yes | No |
| Invite New Users (Additional fees may apply) | Yes | No |
| Remove Users | Yes | No |
| Automatically added an a collaborator to all projects/reports and saved parcel searches | Yes | No |
| Automatically added as a viewer to all projects/reports and saved parcel searches (when global sharing is enabled) | No | Yes |
| Upload custom data layers | Yes | No |
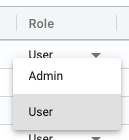
- To the right of the user's name, select the caret symbol.
- Select the user's designated role from the dropdown - Admin or User.
- Click Update Account in the lower left-hand corner.
Deactivating Users
As users shift between roles within your company, you may need to temporarily deactivate some users and activate others within your allotted seats. This can be easily done by selecting the dropdown next to the user's name and choosing Deactivated.
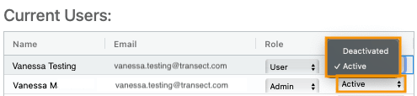
A pop-up will confirm if you want to transfer that user's projects to another owner, or deactivate without reassigning their projects. After making your selecting, click Deactivate to finalize the process.![]()
Removing Users
To permanently delete a user from your account, you'll change their "Status" to "Deactivated." You'll see the pop-out shown below, where you can select Permanently Delete User. You'll transfer the ownership of any projects, reports, and site selections, then confirm by selecting Delete.![]()